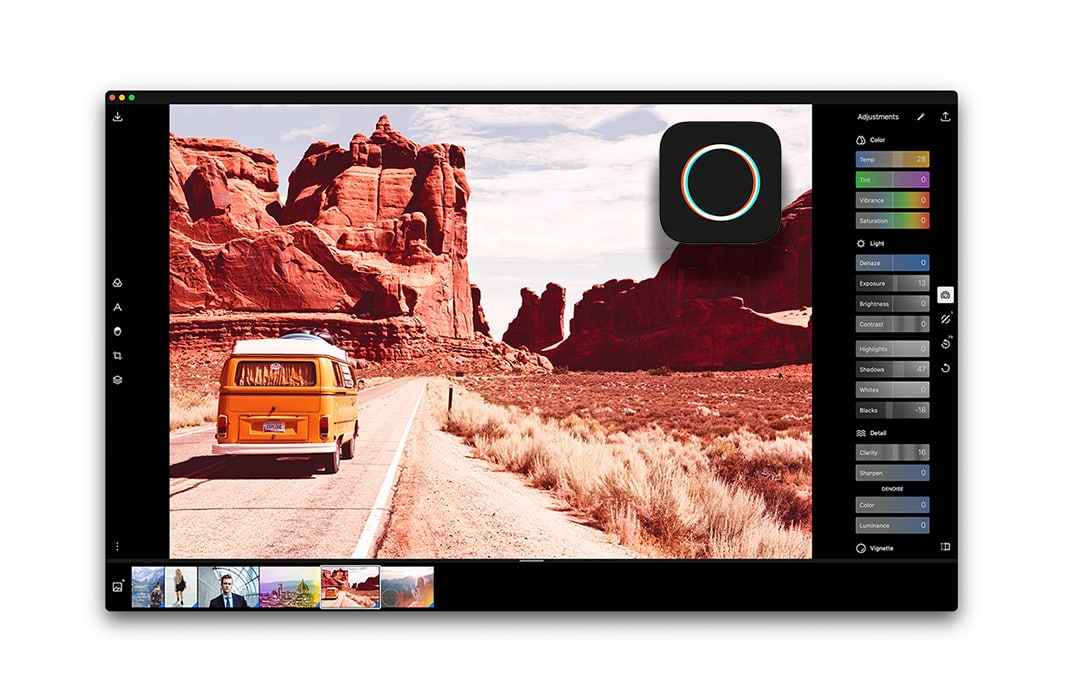
Back in 2015 when Polarr Photo Editor was just getting started, they reached out to me to discuss converting some of my Lightroom Presets into their Filters. The conversation was going for a bit but then they changed direction and put the collaboration on hold. Since then I didn’t hear from them and I had forgotten about Polarr Photo Editor.
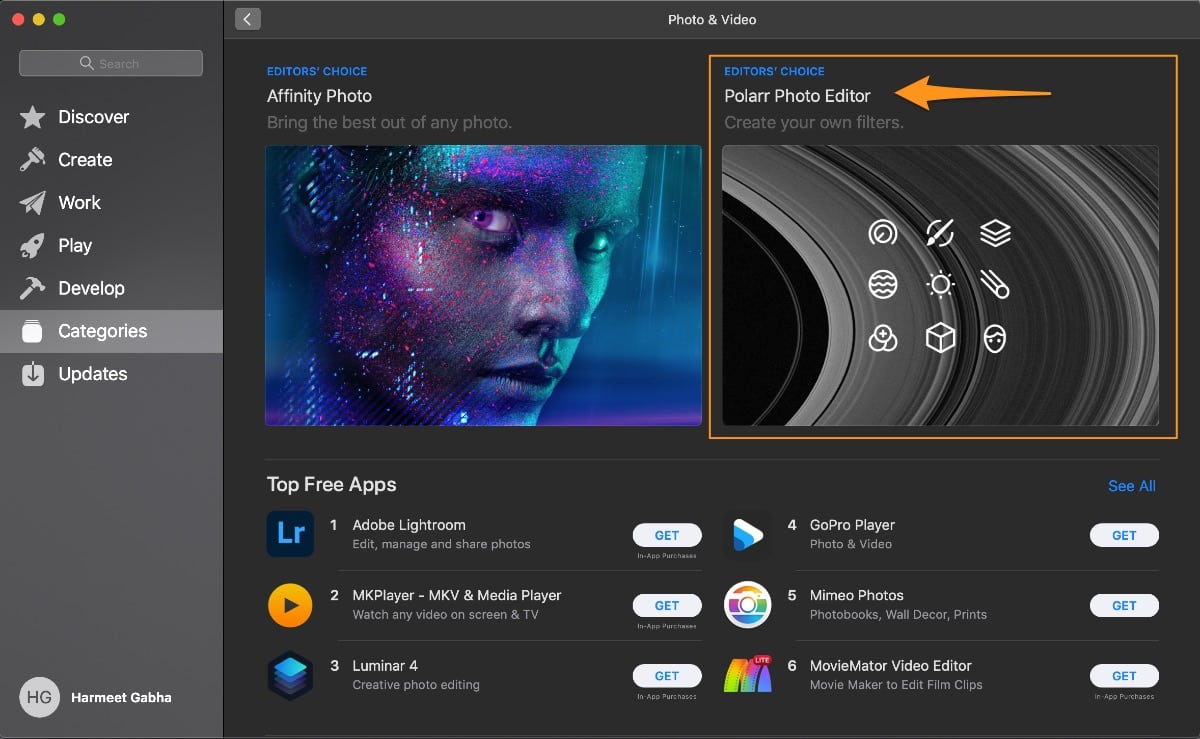
However as I remember, back then it was a web based online editor. Fast forward to today, I was on my computer and downloading all the photos. I shoot RAW and JPEG together but I wanted to quickly edit a few JPEG files to upload to Instagram. I jumped on Apple’s App store to see if there was any image editor that can quick very basic and quick edit when I spotted Polarr Photo Editor listed under Editor’s Choice.
So I downloaded it and started to see what I could do. I realised quickly that it was far more powerful then what I was looking for and I could do a lot more than a basic edit.
The Interface
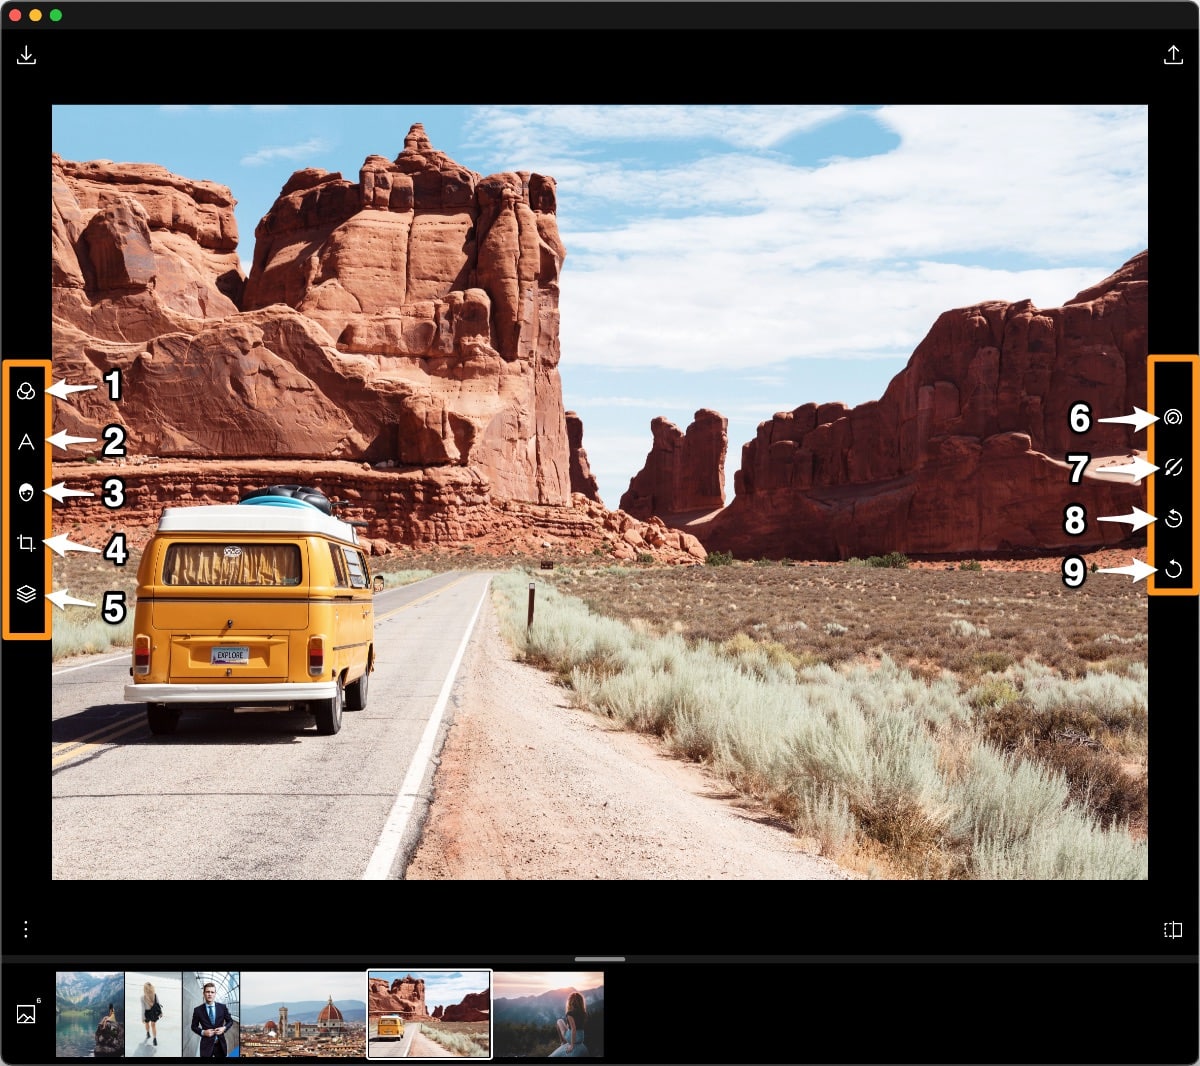
The interface of Polarr Photo Editor is beautifully laid out in a minimalistic fashion. It looks lovely and is very fluid, no matter how you resize the window you will find it very easy to use.On both side you have icons that will perform different functions for you, let’s walk through them:
- Filters [F] – section where you can browse Standard, Premium and Custom filters. These are preset editing settings that you can browse through and quickly apply to give your photo a complete new look.
- Text & Shapes – tool lets you add Text overlay, Objects, Dividers and predefined layouts. This is quite unique feature and quite handy if you want to create Insta Stories, post for Twitter etc.
- Retouch – designed for face detection it has some black magic built in this feature. It detects faces (multiple) and allows you edit/correct any distortion that may be introduced by your lens. You can even do some crazy facial edits. I mean it has features that you normally have to pay to buy in other software.
- Crop [C] – a very easy to use crop tool with many of the popular ratios available in landscape and portrait mode. This is also where you can straighten your image if its not exactly straight.
- Overlays – This is a PRO feature set that is available if you subscribe (USD 29/year). It allows you put layered based overlays on your photo. You can edit Leaks, Flares, Sky, Clouds, Weather, Backdrops, Gradients, Duo Tone, Dust Scratches and Custom overlays. You can build each of these overlays on top of each other, adjust opacity, and blend mode as well. Something that Lightroom today, still can’t do and probably Adobe would never introduce as that’s why they have Photoshop.
- Adjustments [A] – this is where you will go to edit your photos exposure, temperature, curves, sharpness, HSL, Vignette and many more.
- Selective Adjustments [L]* – This is a PRO feature set that is available if you subscribe (USD 29/year). Selective editing allows you to edit the photo by brushing over or applying the settings to particular region of the image and not the whole image. You can apply these adjustments using A.I. Detect (artificial intelligence), Colour, Brush, Radial, Gradient or Luminance. These are finer adjustment that if you are a newbie you don’t need to bother with. You will eventually grow into these as you get used to using Adjustments (6).
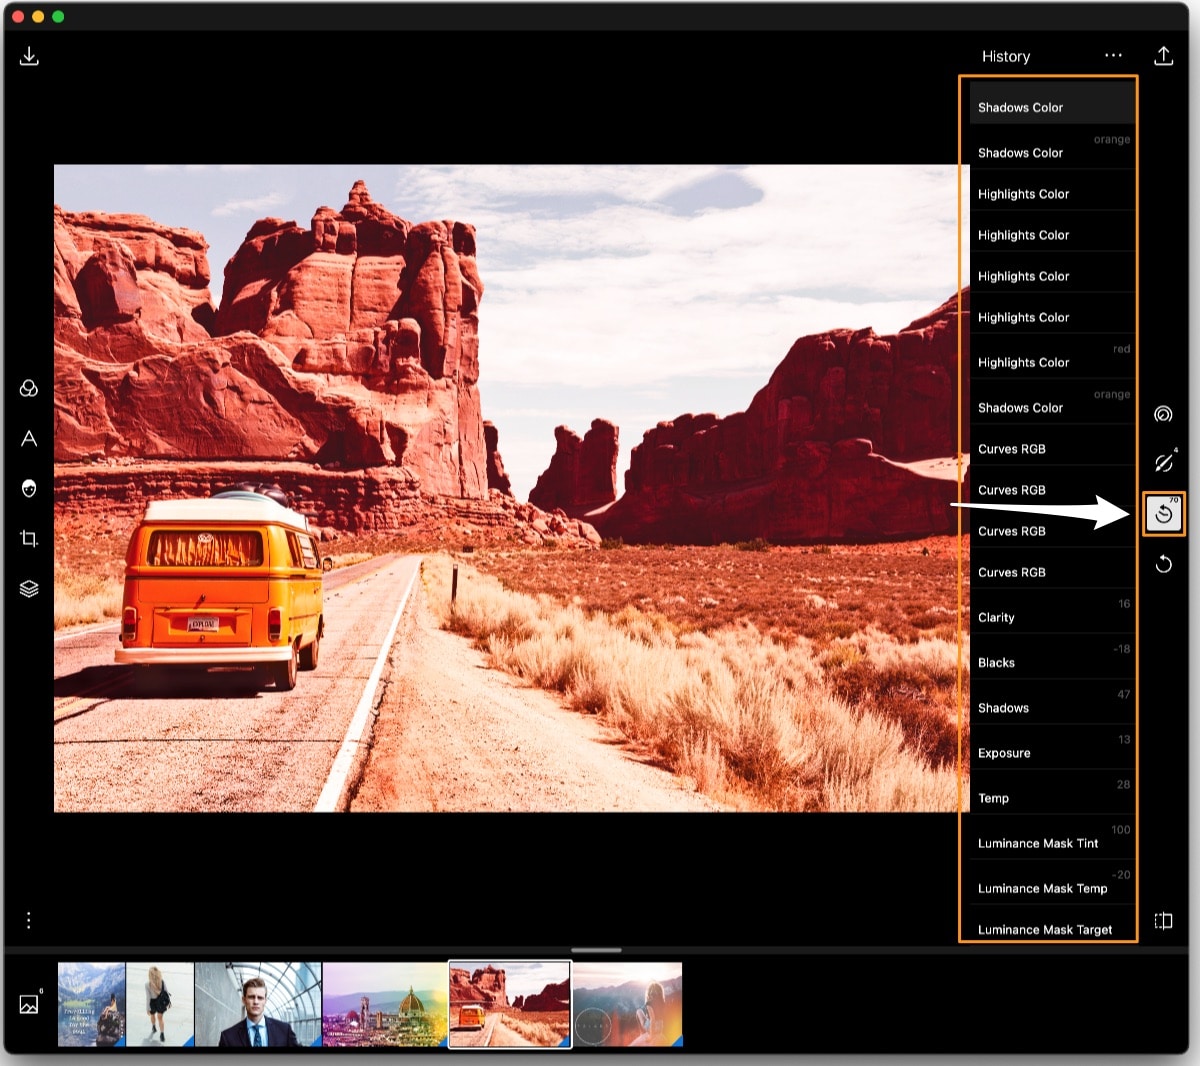
- Editing History – makes it easy to go back to any image that you have edited. Basically this is unlimited Undo(s), you can jump back to a particular edit state and resume your edit from there.
- Undo – undo the last edit, one step at a time. If you need to jump back a few steps, faster way to do this would be use Editing History (8).
To review in detail check out the comparison list of the Free vs Pro features of Polarr. You still get tons of awesomeness in the Free version.
Filters
Filters are an amazing place to start if you are new to editing. Simply flick through the predefined filters already created for you and you can turn your photos from snapshot to amazing shots.
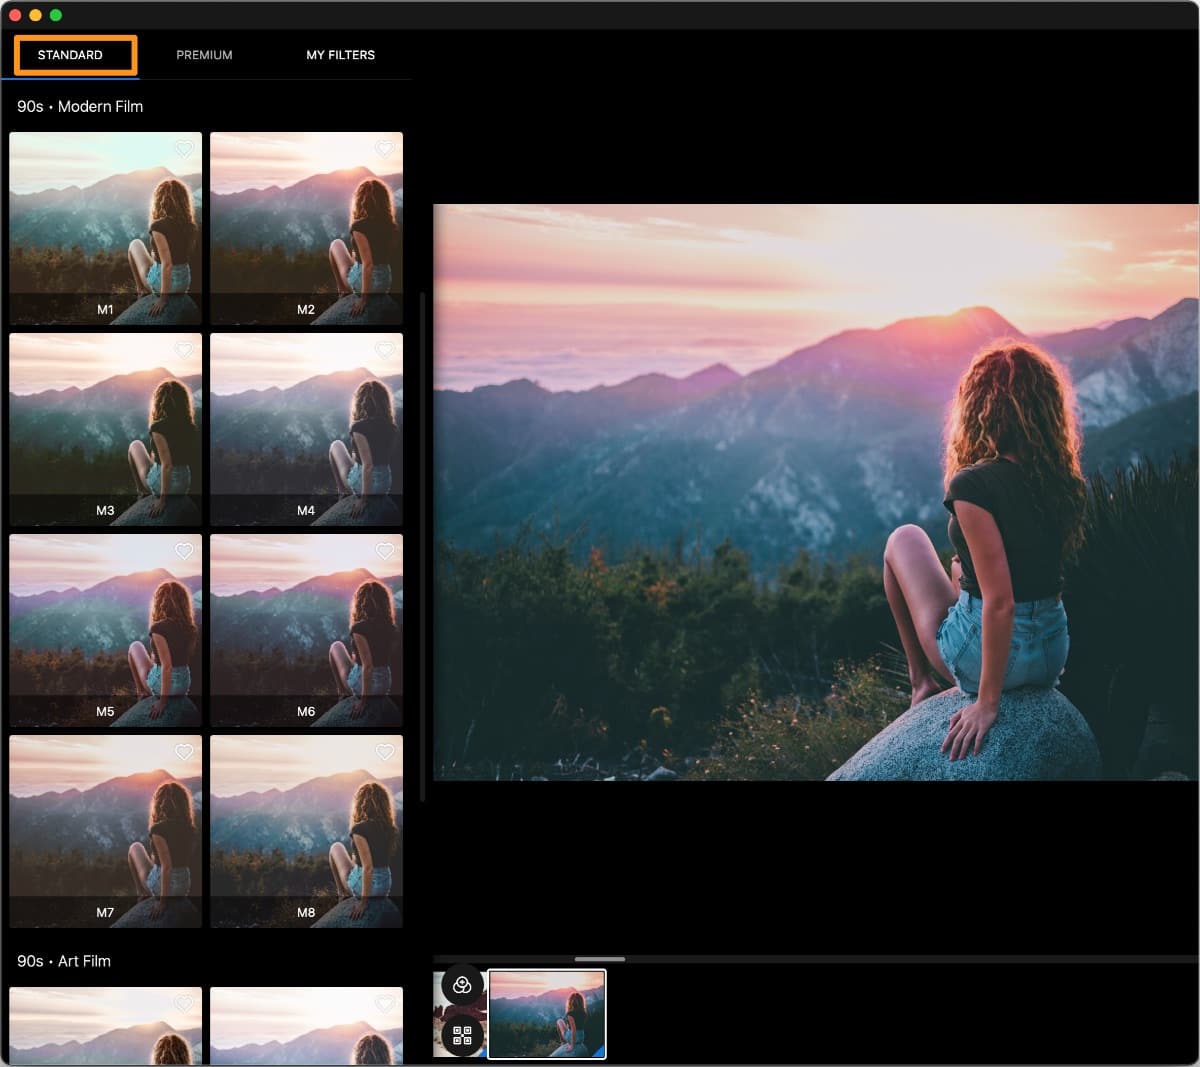
There are Standard, Premium and My Filters.
The Standard filter has many options and looks that you can use, there is no teasing here that you see some nice filter but they are then only available in Premium category. What you see in Standard is what you can use, that simple.
Once you decide to go Premium, you can sign up to their subscription which is dirt cheap like USD 2.99 per month or USD 29 per year. But with this you can a lot more tools in Polarr, not just Premium Filters.
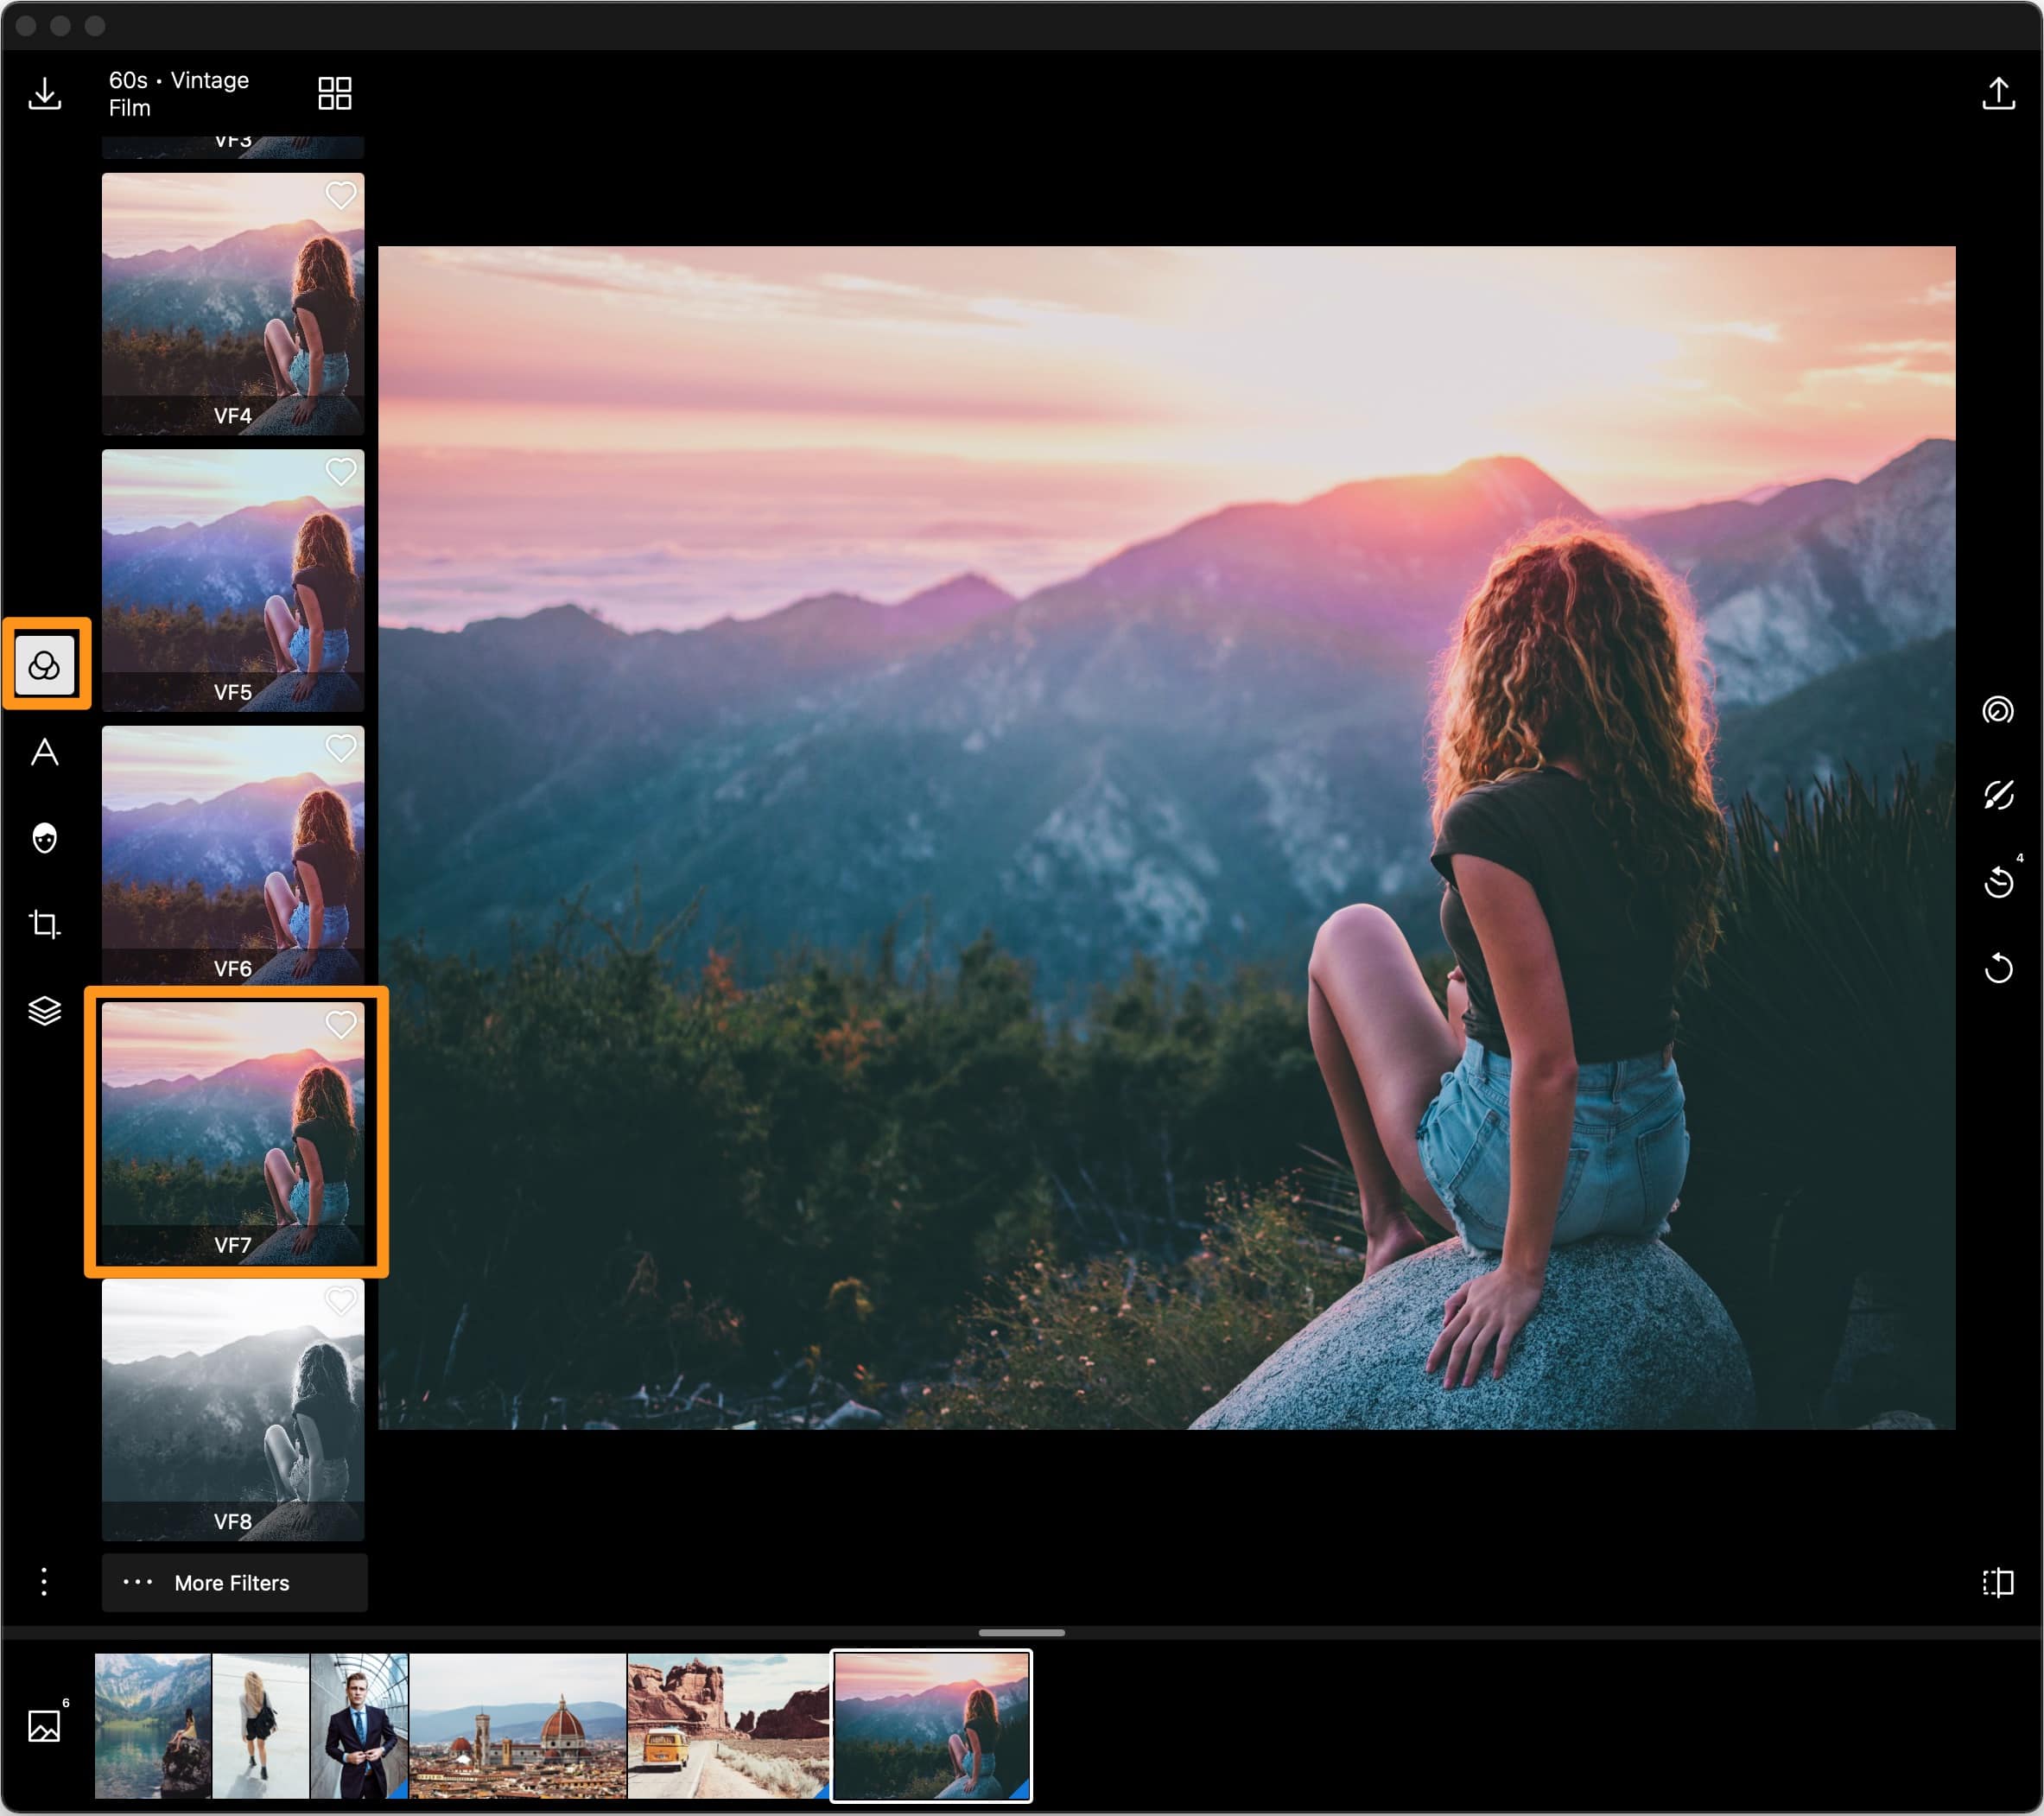
Clicking on More Filters option will bring up this additional panel where you can select from Standard, Premium and My Filters option.
Simply choose the Filter that you want to use and you are away.
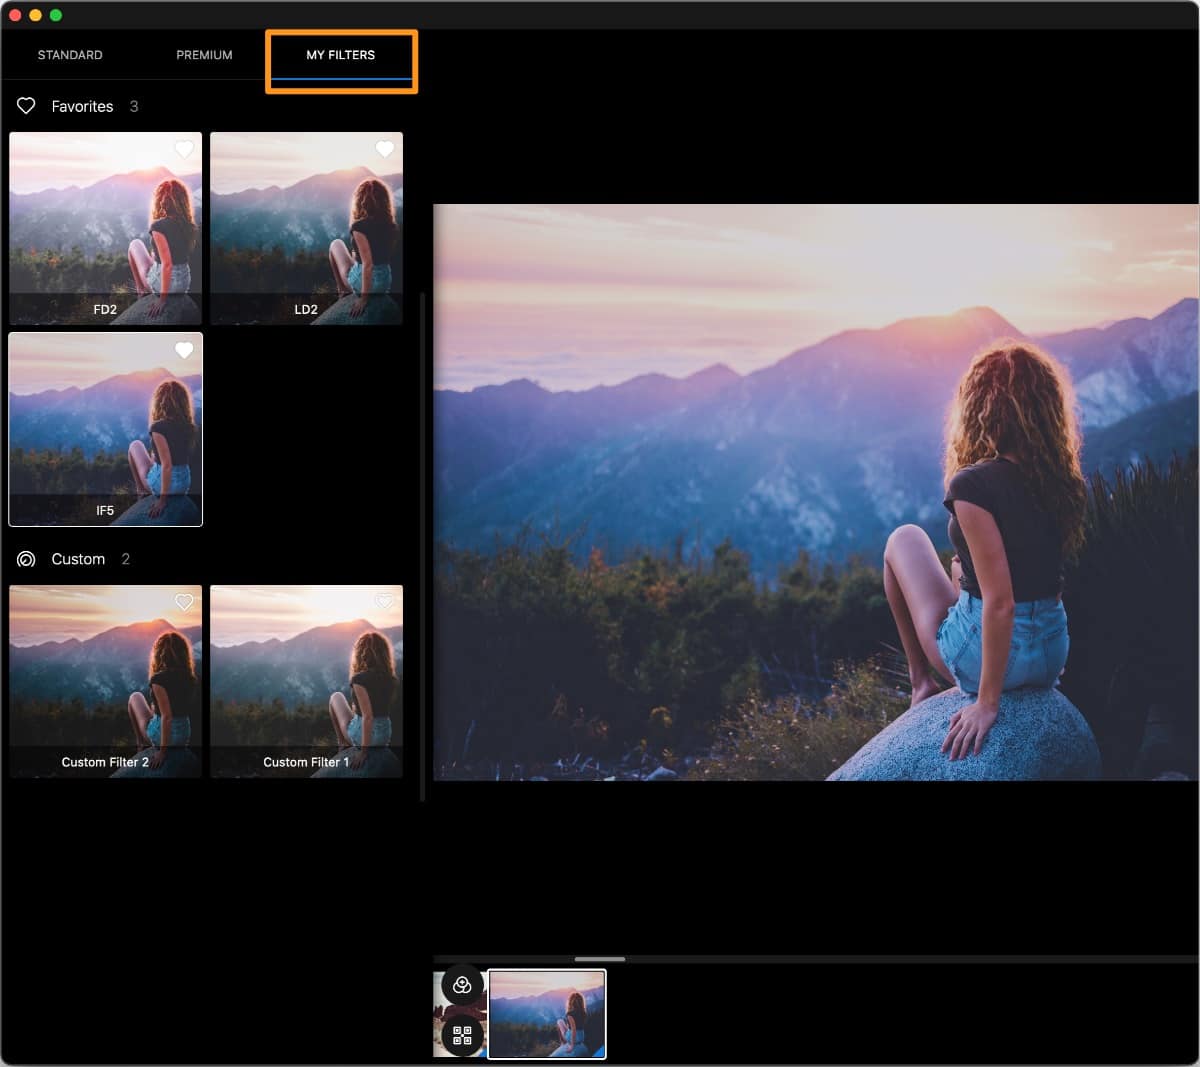
Of course from any of the filters if you heart them, it puts them in your favourites under “My Filter”. This is a quick way to edit you photos using your favourite Filters. This is also where you’d save any Custom Filters that you may create yourself.
To get back to editing simply click back onto the Image and you are back to all the options. This was tricky thing I found and was confusing at first as there is no “done” or tick mark anywhere.
Text and Shapes
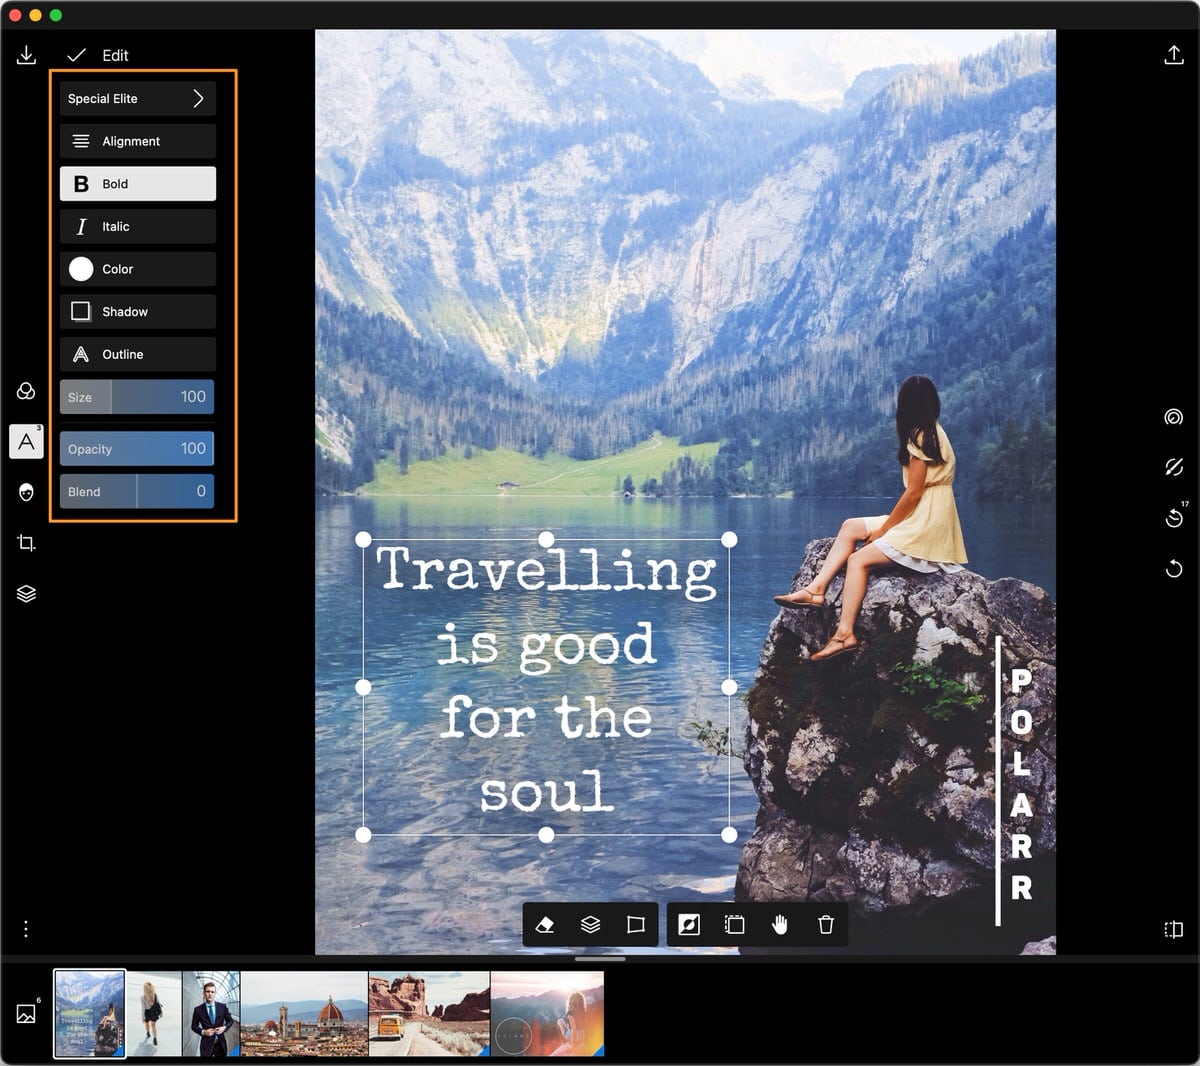
Text and shapes allow you to create meme, social media posts by adding layers of text and shapes on top of your image. You can choose from a ton of fonts available in Polarr. Not something that is possible in Lightroom, you need to jump into Photoshop to add some text or shapes.
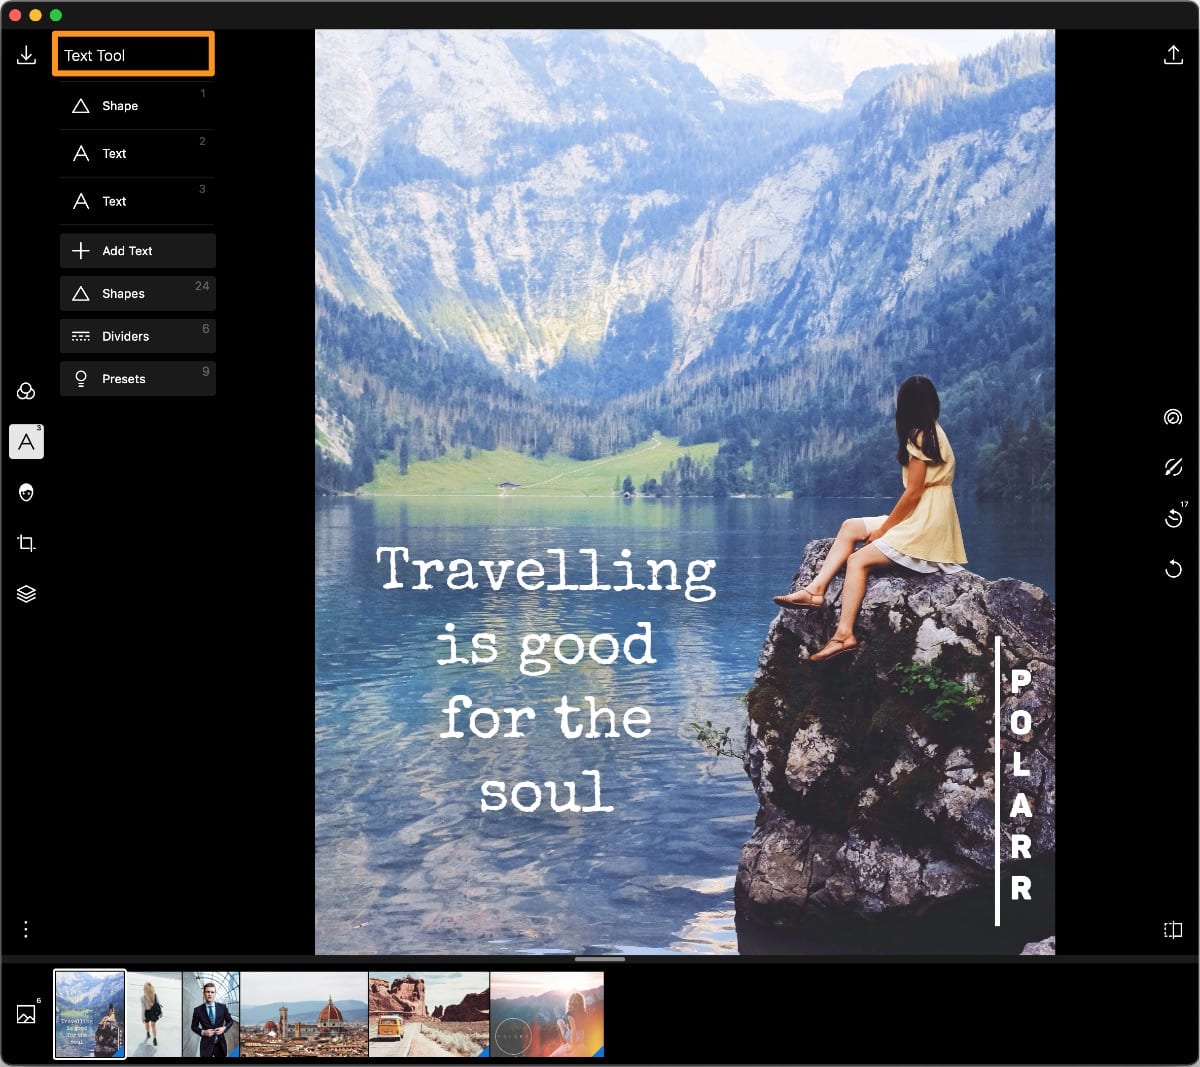
You have many options to customise your text:
- Font – choose the font that suits your image or style
- Alignment – align text either left, centre or right
- Bold and/or Italics
- Colour – colour the text to integrate the text into the image. The one option missing here is the colour picker…that would make it awesome
- Shadow or Outline
- Size of the text can be adjusted
- Opacity can be adjusted as well and Blending of the text.
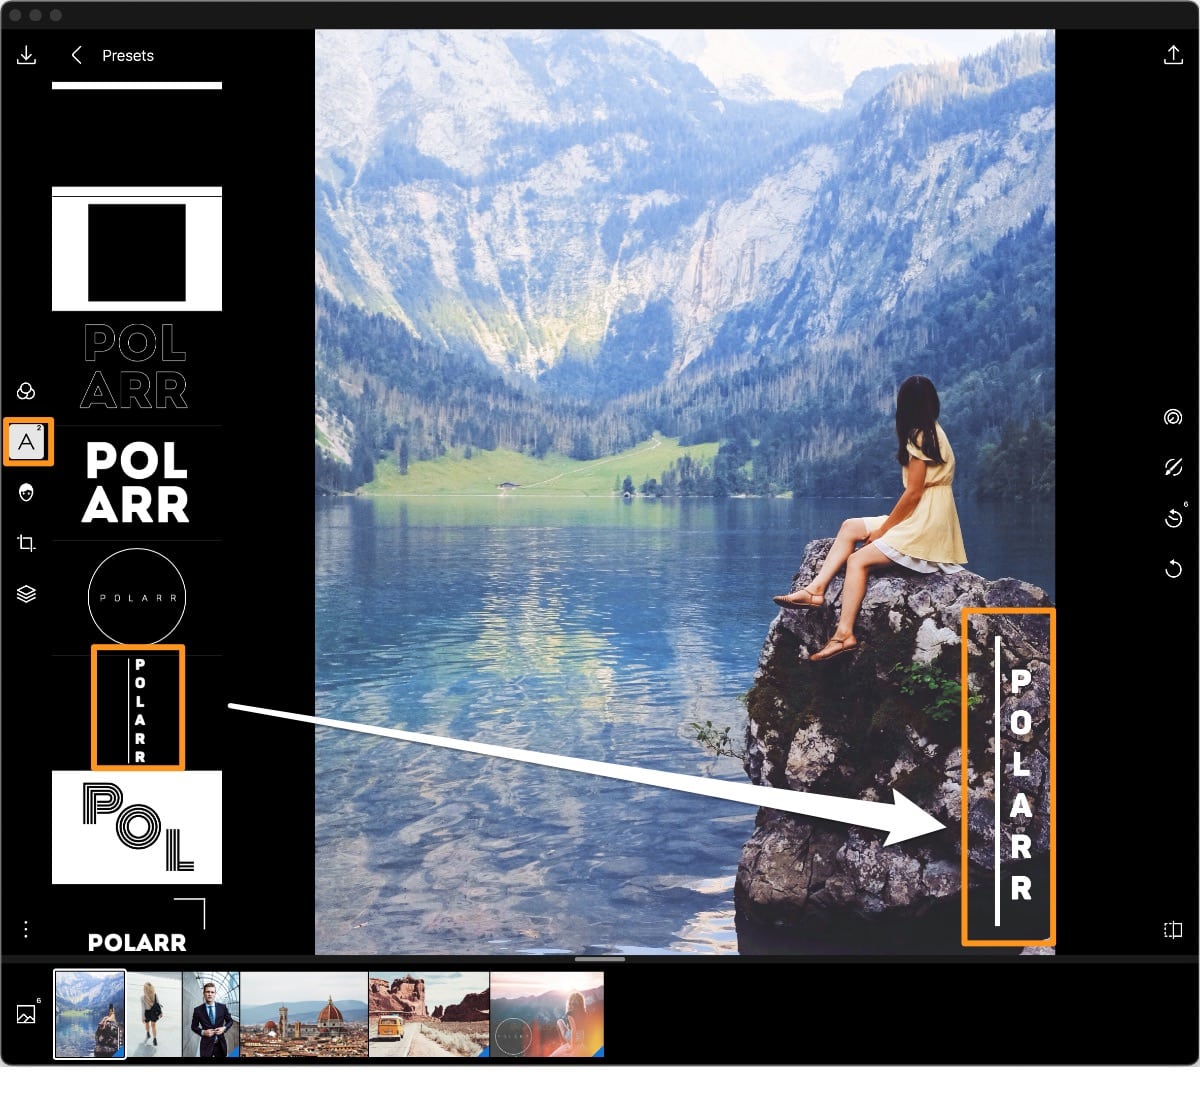
Presets are some pre-made text and shape combos (as seen below) that you can add to the image and start to customise it to suit your image. The only missing thing here is that you can multi-select the objects and text to resize them or move them but they work, you just have to move them independently.
Retouch
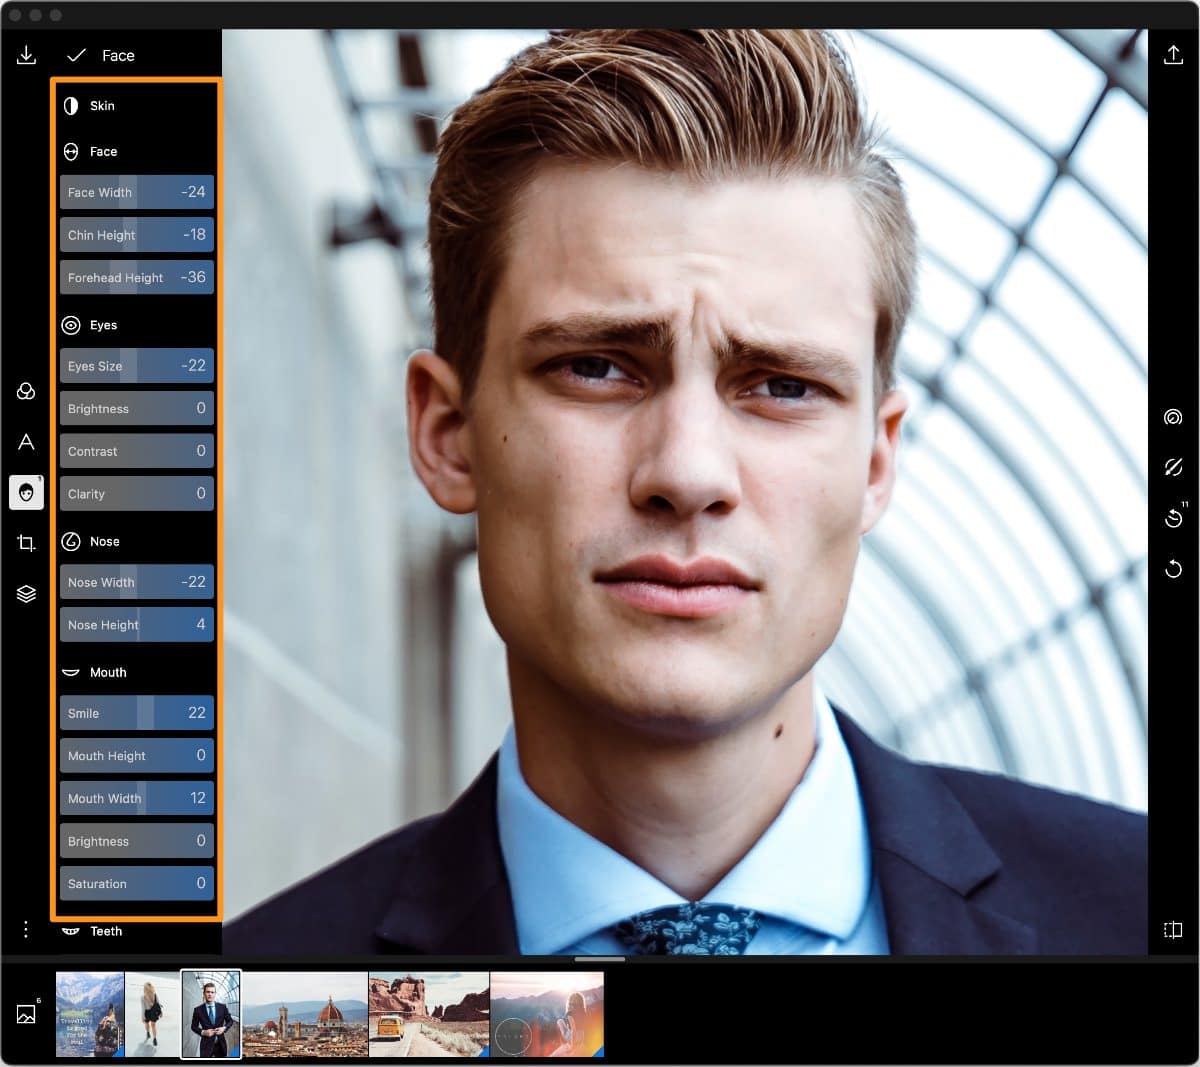
Some amazing tools available in this section to detect (automatically) faces in the image and give you the opportunity to retouch various face features and improve the portrait of your subject. You can remove lens distortion, make facial features big or small. Adjust the contract and brightness of them etc.
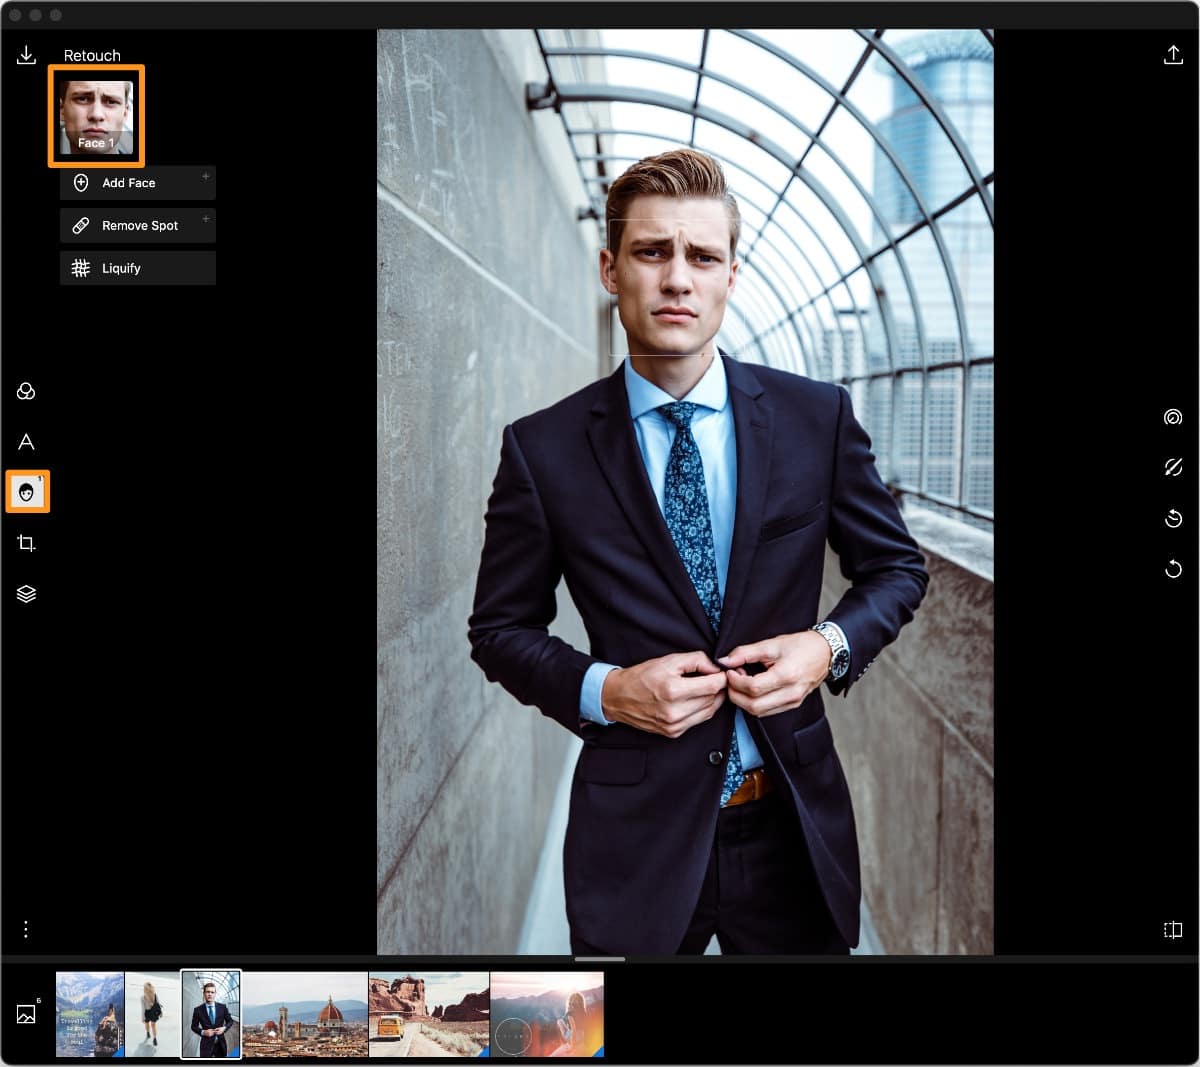
There is also the ability to manually select a face in case the automatic detection failed.
Click on Face 1 that has been detected and you can individually retouch the face. You also have spot removal tool that can let you remove some imperfections or marks from the subject’s face.
If you are comfortable with the liquify tools, this is also available in Polarr so you can use this to pinch, bulge or wrap parts of your image. This is like Neo moving in the Matrix when he realises he’s “The One”, you can bend pixels using the Liquify tool.
With only just using sliders, you can go to work. It’s amazing how this software preserves the different facial elements and adjusts others. You can really go to town with this thing. Some of the features are usually available in high end paid software but here in Polarr Photo Editor, they are free.
Of course no comparison here as Lightroom has none of these options.
Below is a photos quite vigourously edited..sorry whoever this is in the photo!! It’s just for illustration purpose.
So in this case I’ve really ruined the face here but if you only saw one of the two images, you would not know that there is anything wrong. Right?
Crop
Cropping your photos is one of the most…most common things you’d do before you share it on social media or sent to a client for review and approval. Polarr Photo Editor makes it quite easy to crop, rotate and flip your image.
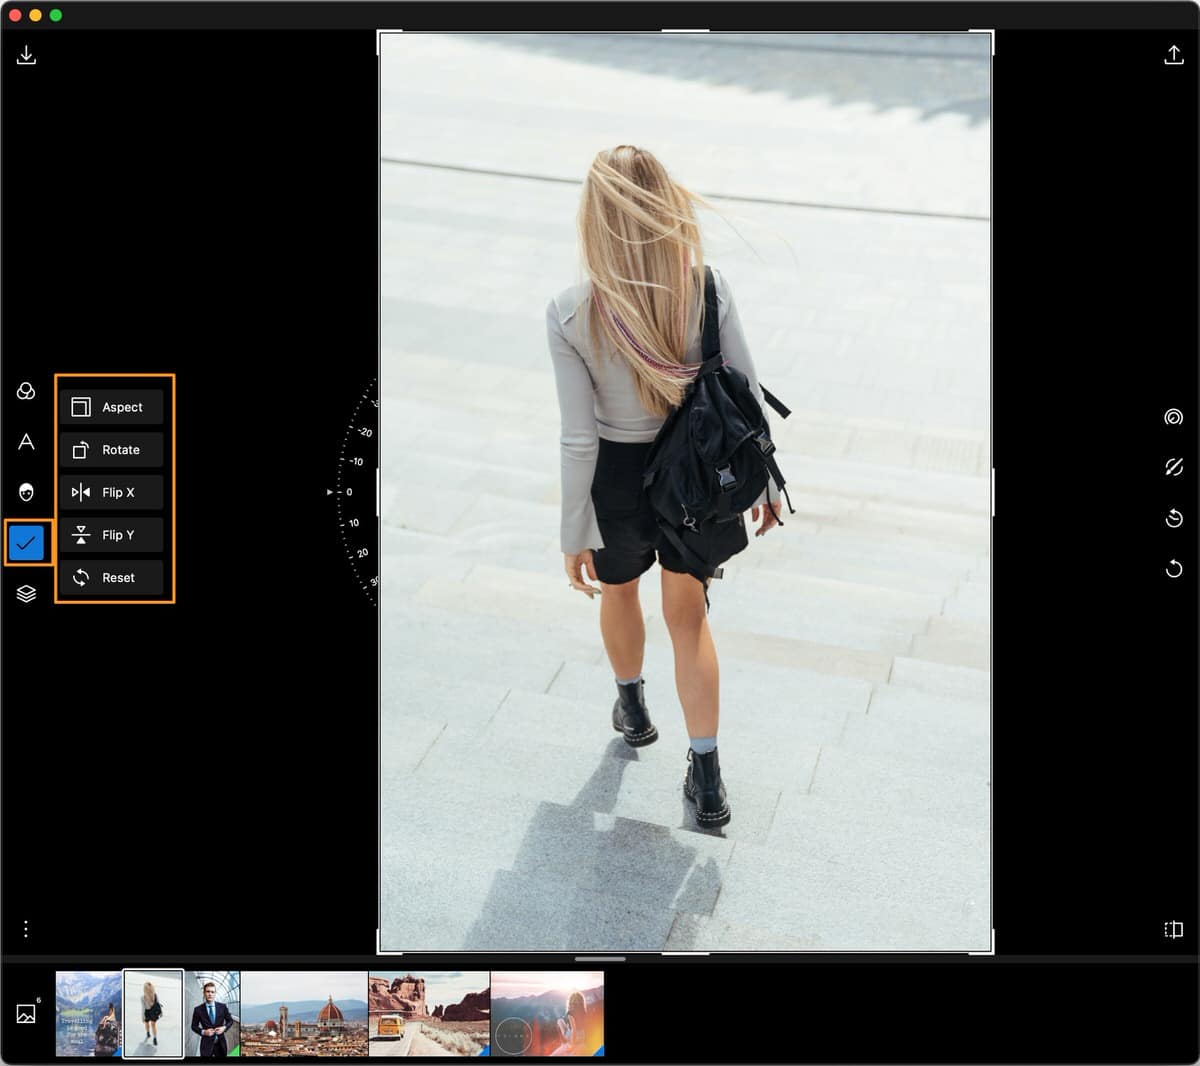
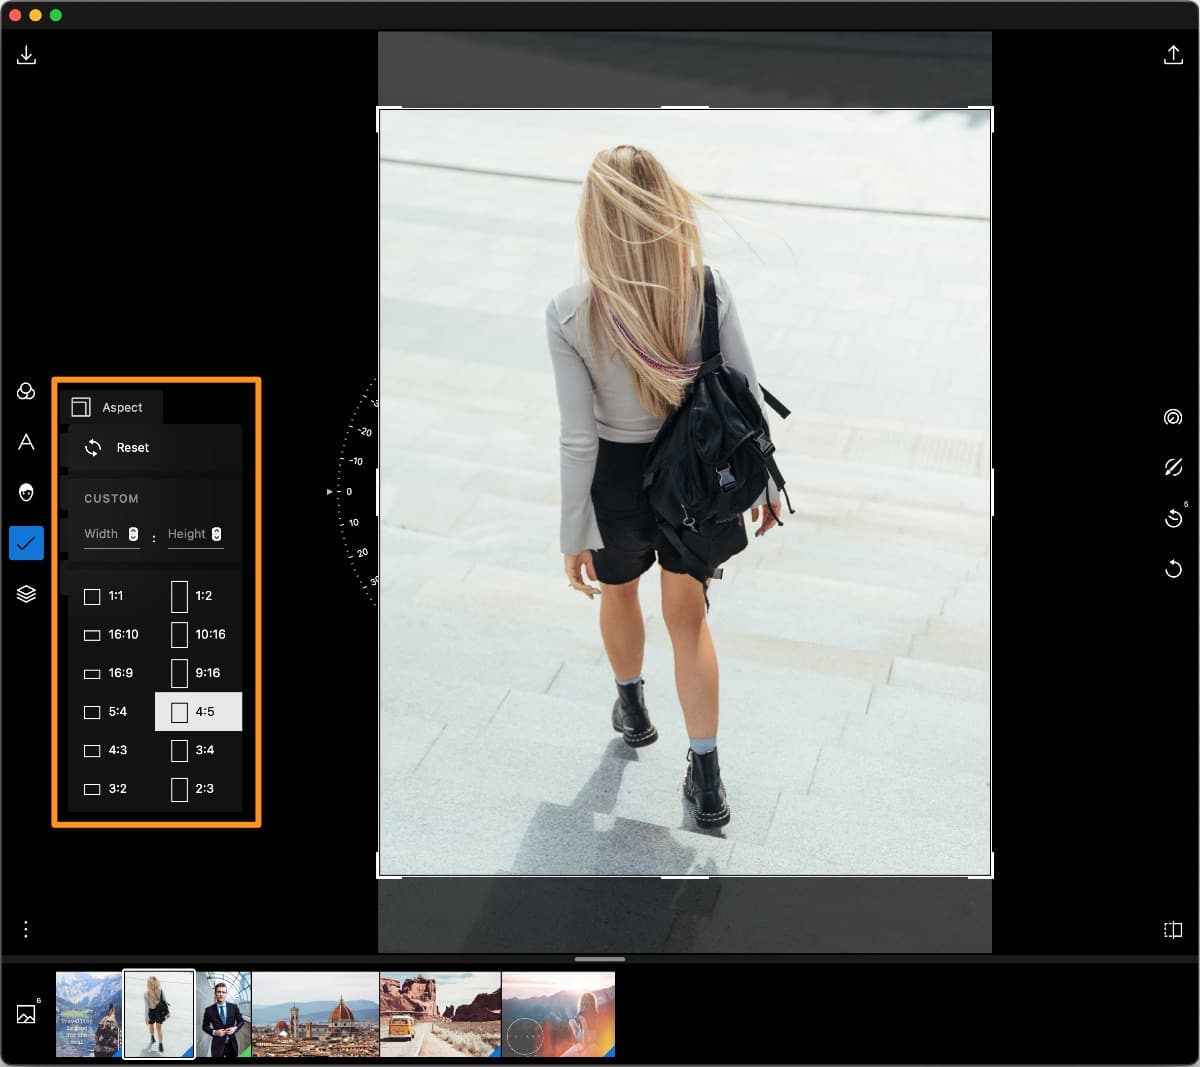
You have all the very common ratios available as presets in landscape and portrait form so you can easily do the crop. You have square (1:1), Wide (16:10, 16:9), Standard Photo crops (3:2, 4:3, 5:4). This was one of the reasons why I started looking for an easy to use tool. I didn’t want to import photos in Lightroom just for doing basic Cropping or send them to Photoshop.
Polarr is perfect for the situations where you have shot your image just right and only thing you need is a quick crop and you are done.
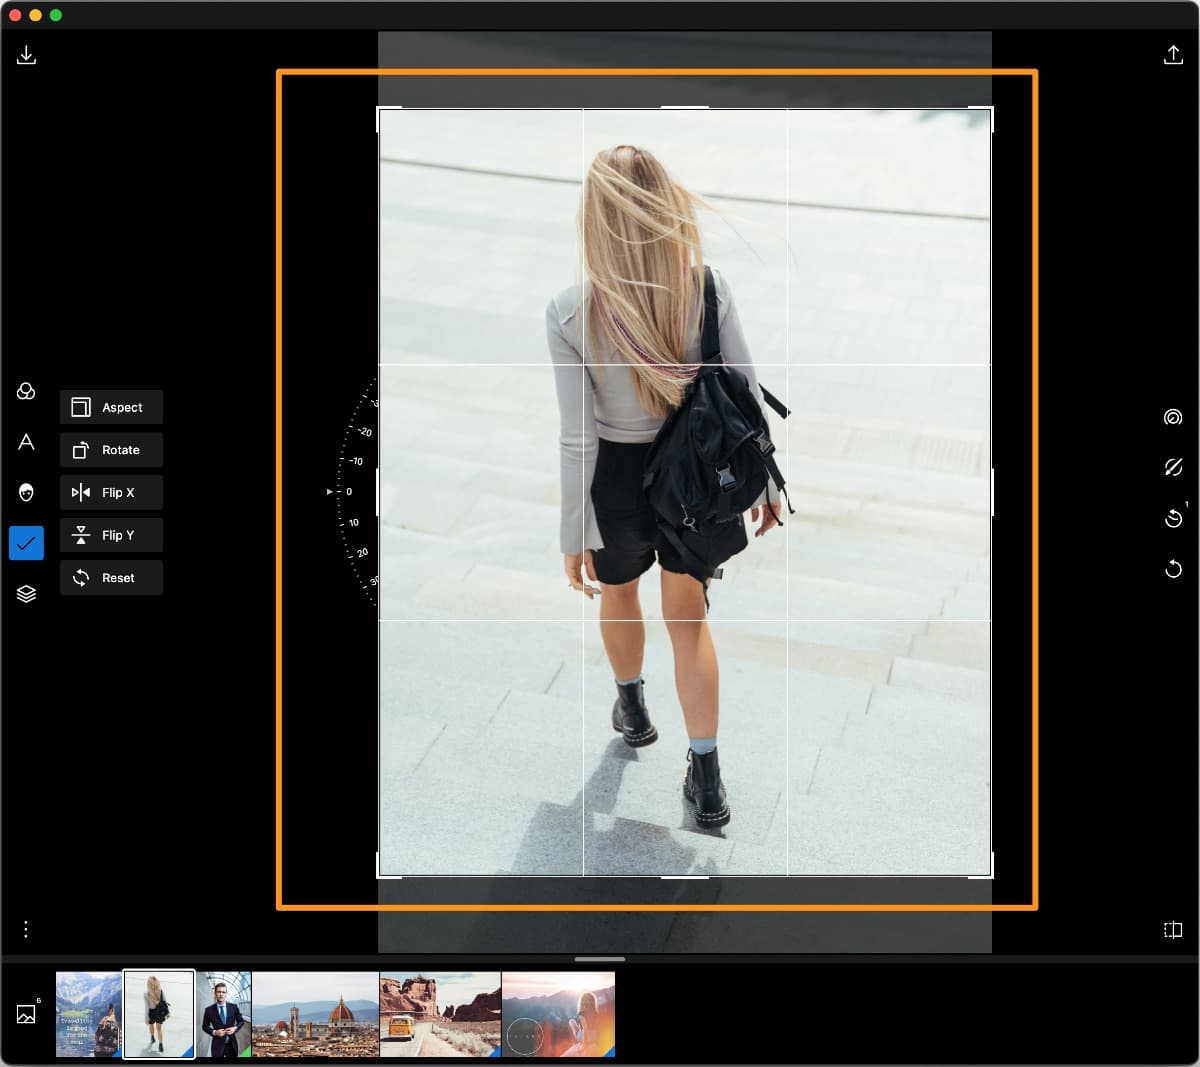
As soon as your starting to do the crop this superimposed grid appears which helps with your cropping and adjusting of your composition. The only grid available at the moment is your standard 3×3 grid. It would be great if you had other composition grids available for use as well here but not a big deal.
You can also straighten or rotate the image by grabbing the dial on the left side of the image. It makes it easy to to straighten your image and composition. If you want to reset it snaps back to 0 position when you rotate the dial back.
Overlays
Are another creative edits you can apply to your photos, from adding lights Leaks, Flares, Sky, Clouds, Weather, Backdrops, Gradients, Duo Tone and Dust & Scratches you can also apply custom overlays like textures to your image.
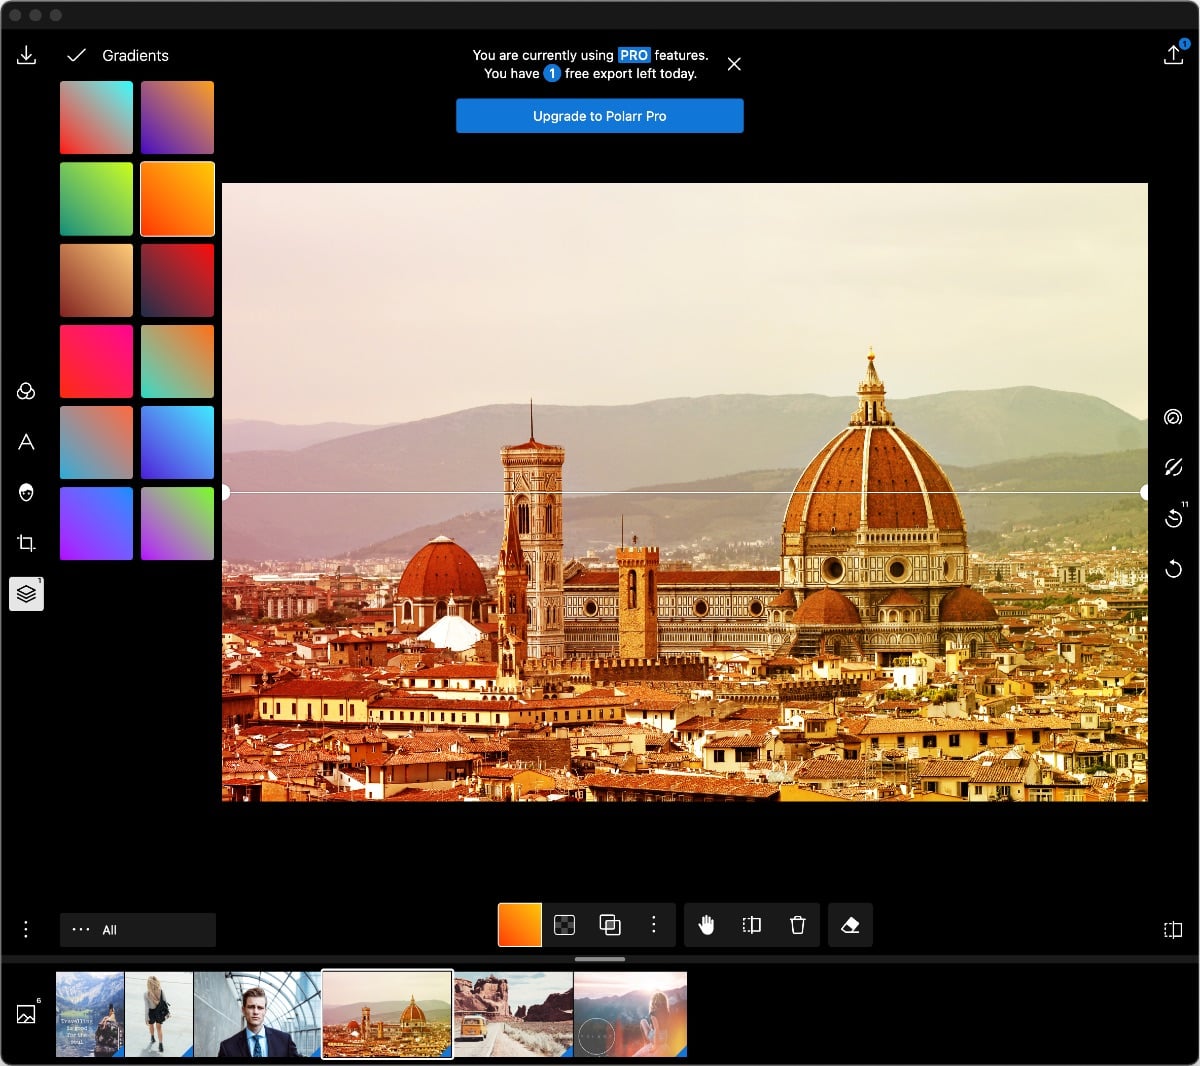
There is no limit to what you can do here but these are PRO features (see below image with Leads and Gradient applied as overlays). You can try them and edit ONE image for free each day, which is nice of Polarr. You can get a feel for what you can create and export the final resulting image.
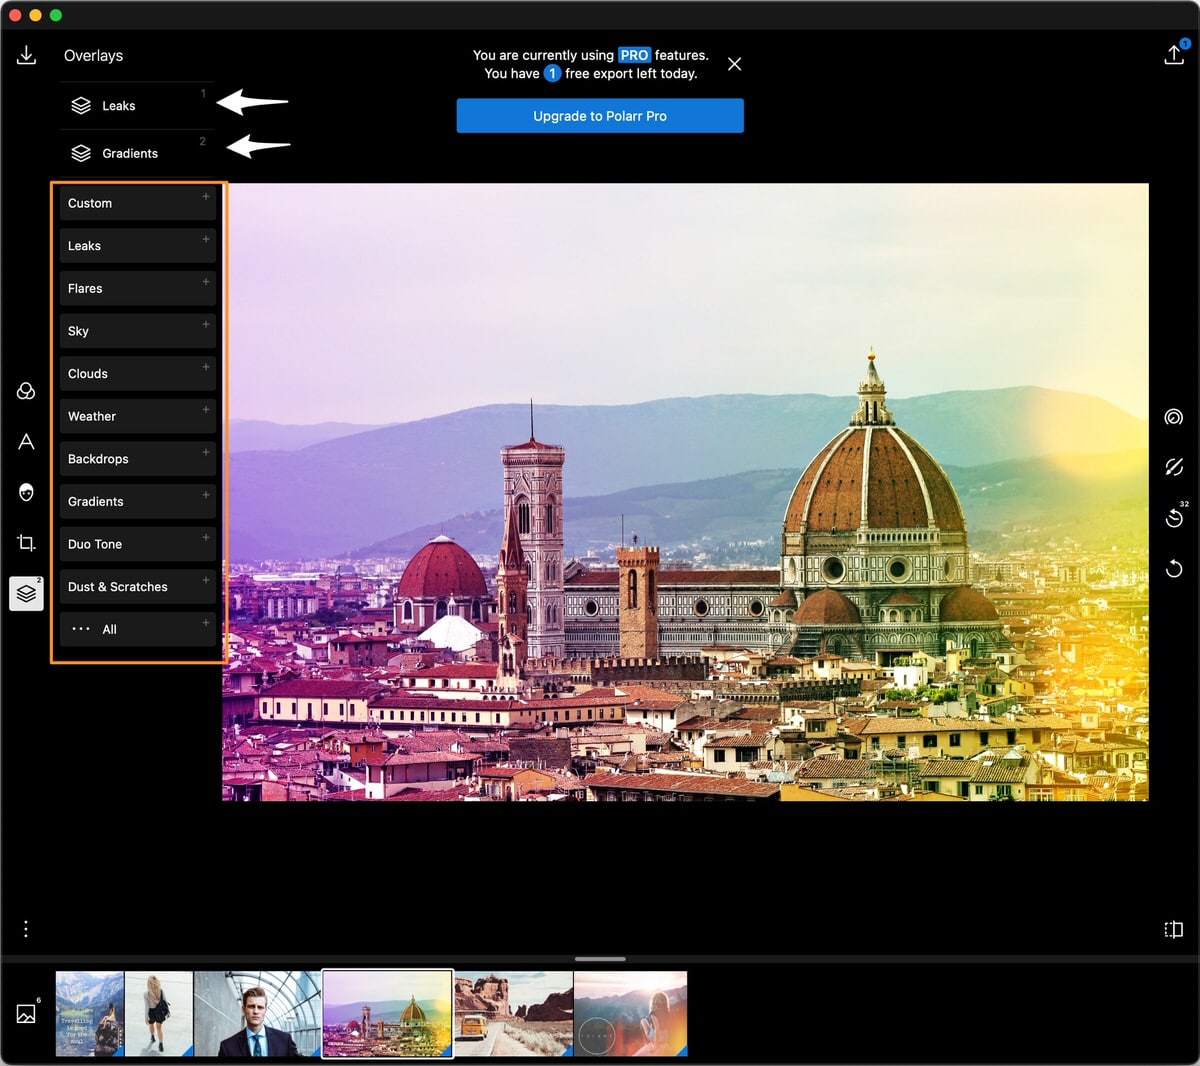
As an example let’s explore the Gradients Overlay options. You have a new tool bar at the bottom of the image which let’s you do many different things to the overlay you are working with.
You can modify the colour scheme of the colours that will be overlay on the image, you can choose the blending options like Screen, Overlay etc..(they have all the standard options), adjust the opacity of the overlay to reduce its intensity.
You can move, rotate, resize your overlay and apply a mask on our overlay so it only affects a certain part of your image.
Adjustments (A)
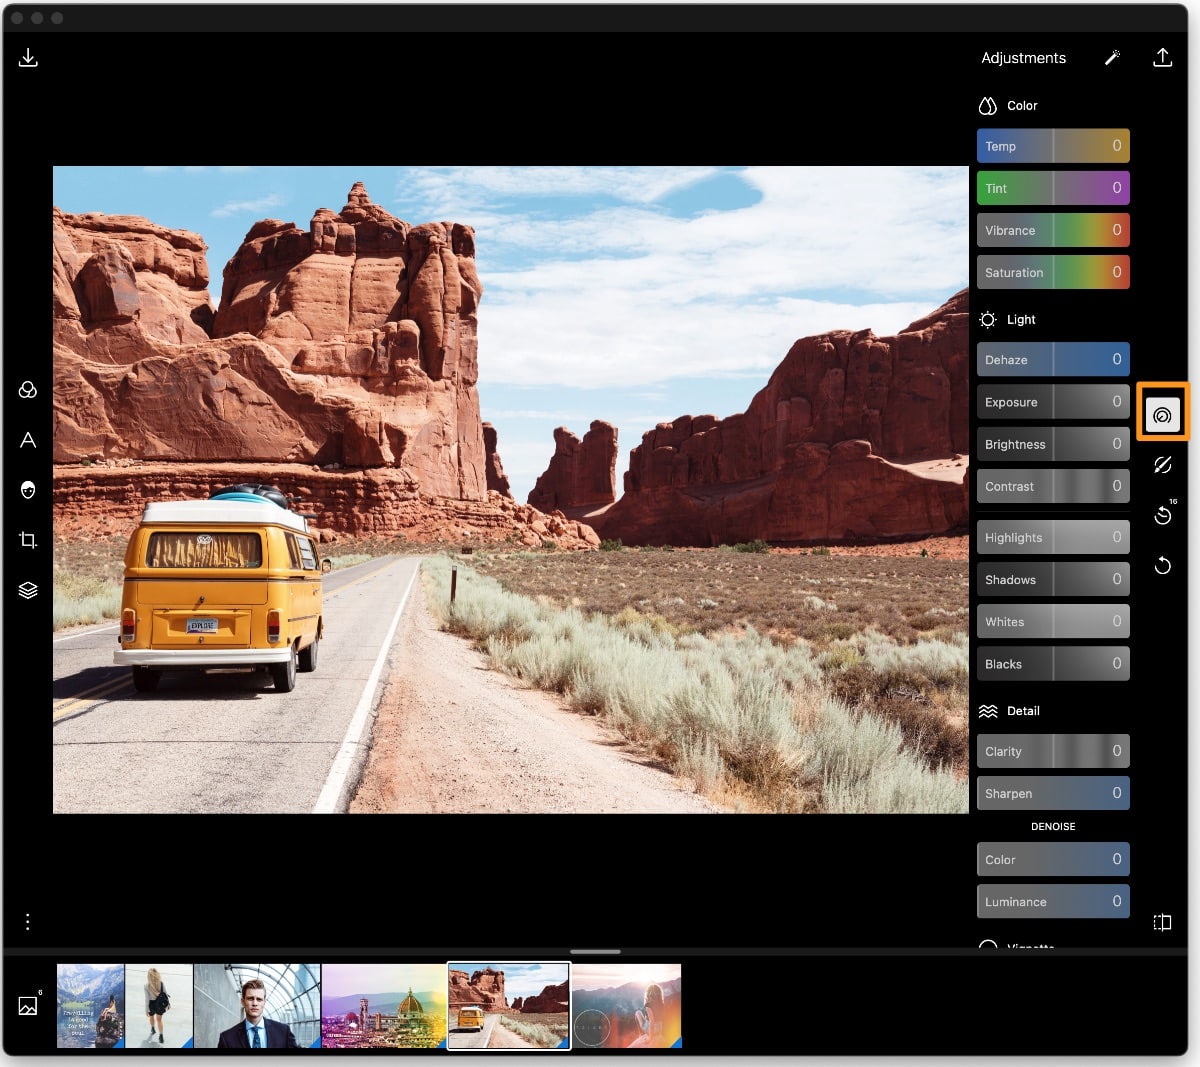
On the right hand side of the main workspace, you have Adjustments panel where you can process and edit the various settings like Exposure, Highlights, White and Black points.
This is a very feature rich panel considering the Free version. You can adjust:
- Details – increase clarity and sharpness
- Denoise – remove noise in Colour and Luminance
- Vignette – apply a vignette to the image and change its centre point
- HSL – Hue Saturation Luminance is a very powerful feature when you know how to use it correctly. Search for HSL on this blog to find many other related posts.
- Curves – adjust the Global or RGB curve individually to add contract and create your desired mood in your image.
- Toning – use this to create a split tone image by adjusting the highlight and shadow colours.
- Distort – adjust and correct lens, horizontal and veritical distortion
- Border – add border to the image
- Effects – add some crazy effects to reflect your image, pixelate or even invert it (like a negative)
- LUT – got any LUT profiles on your computer you can add these as well to create a specific colour/cinematic look for your image
You can further Copy the edits you have done to this current image and then paste them onto others, if you have shot a series of images. This is quite handy and smart way to edit and process your images.
Selective Adjustments
This is a PRO feature area where you can use selected adjustment applied using various masks to the image.
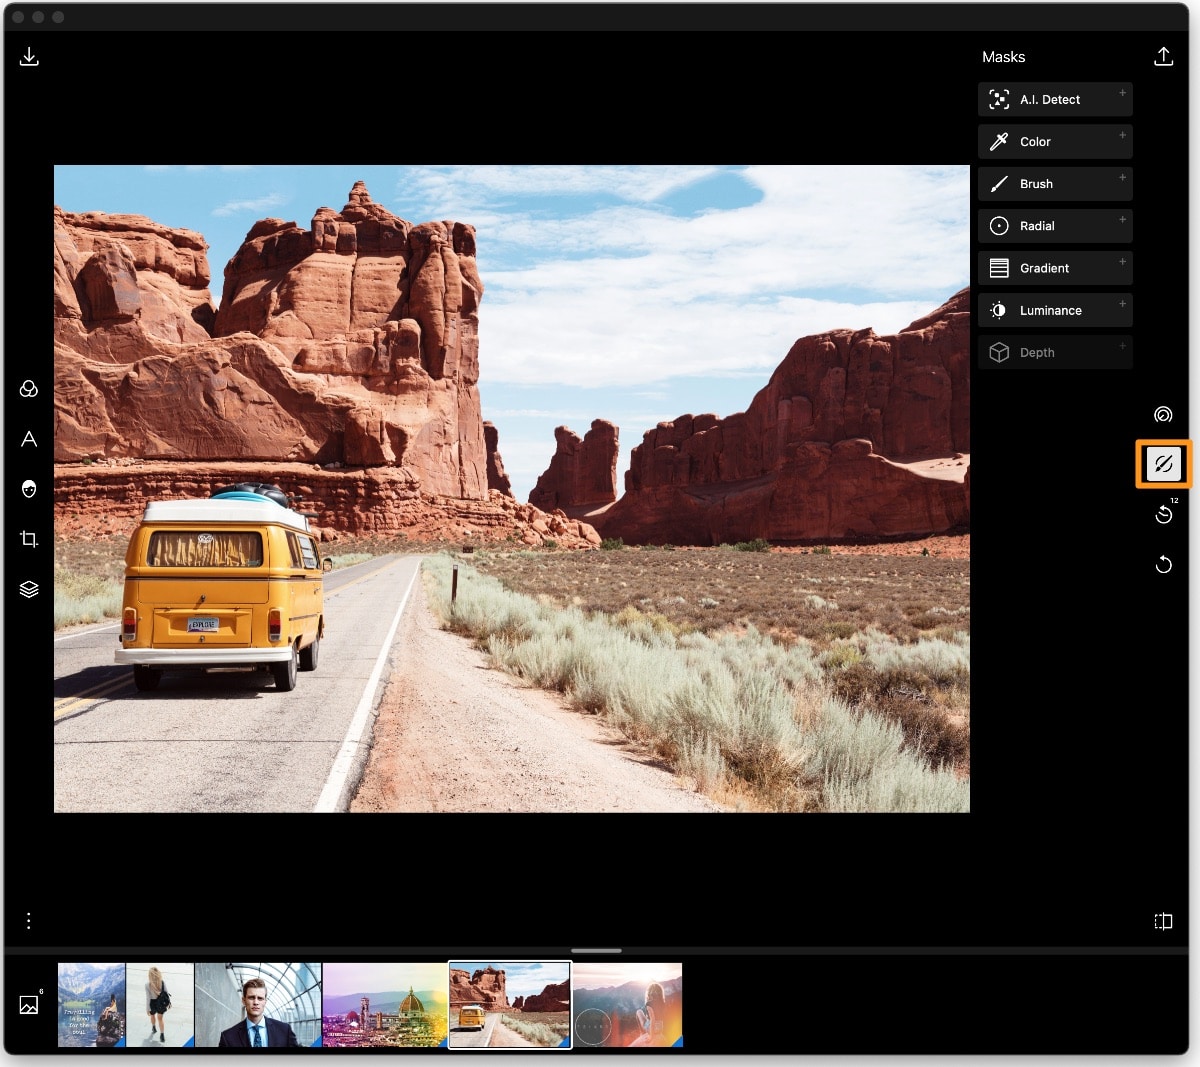
Some of this stuff just blows my mind for the features vs the price!!
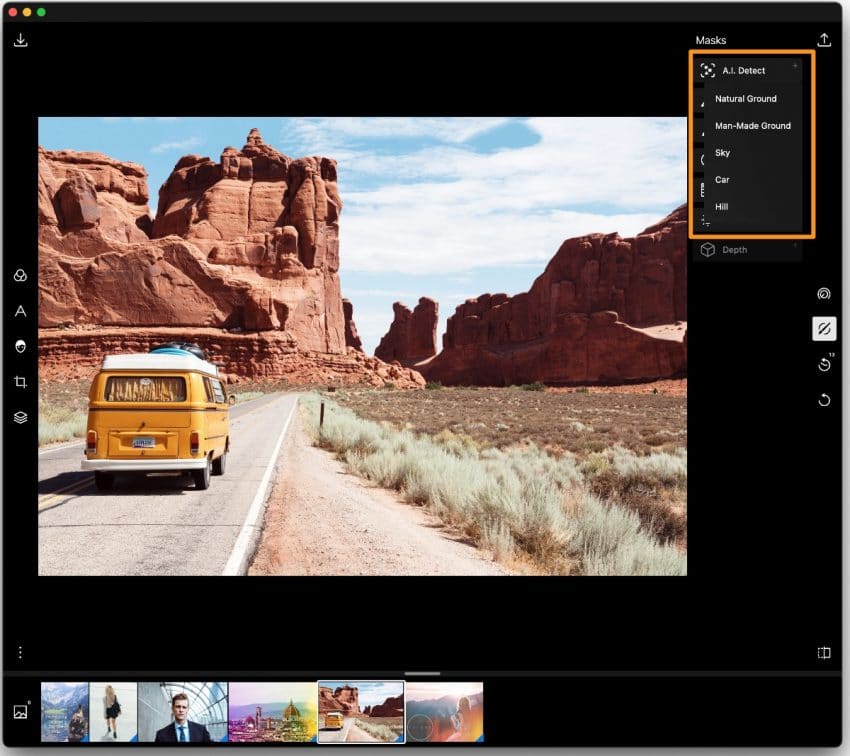
- AI Detect – this is next level amazing!! See how it detected the Natural Ground, Man-made Ground, Sky, Car and Hill in this image. These are automatic masks created by the software.
- Color/Colour – colour mask allows your to select a specific colour in the image and apply different adjustment to it.
- Brush/Radial/Gradient – these are common masks available in most selective adjustment tools that will let you define a mask area where the adjustment should be applied using Brush, Radial shape or Gradient
- Luminance – this is a tricky one for most people. Think of this as a brightness range that will let you apply the selective adjustment to only those areas that fall within this selection of brightness.
Edit History (E)
Don’t like what you have created, well you can have unlimited undos using the edit history. You can see the entire edit list and simply jump back to the desired step where you were happy with the edit.
Conclusion
Having re-discovered Polarr Photo Editor I’m enjoying using this feature rich product. I have signed up to their PRO plan which is a yearly subscription and enables me to access all the features without any restriction.
Even if you don’t want to go PRO, there are so, so, so many amazing features that are just given out for FREE that you don’t need to use any other editing software for your images. Forget about Lightroom!! Minus the cataloging feature, Polarr Photo Editor has so many more features that Lightroom.
Not to mention the performance of this software is amazing, it works like a breeze. There are no lags, no spinning wheel so its been well optimised by its makers.


